|
|
|
|||||
|
Easily Convert Your Photo to Grayscale Using Photoshop LAB Mode
Article by Jeanette Smith
There are several methods for creating a grayscale photo in Photoshop. One way is not necessarily better than another, it's simply a matter of personal preference and your comfort level with Photoshop. To name a few methods, you could use the RAW Converter, various adjustment layers such as Hue/Saturation, Channel Mixer or Black & White, or the method I've chosen for this tutorial — the LAB Color Mode.
This "additive" method, as opposed to an editing or corrective method, takes advantage of the Luminance Channel in the LAB Color Mode. I particularly like this method because
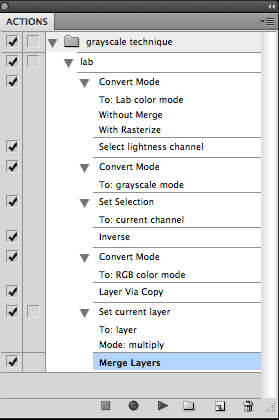
In short, with this method, we are utilizing different color spaces, going from RGB to Lab Color to Grayscale, in order to capture the luminosity, or lightness, of an image. We inverse this to achieve the darkness of the image, then isolate that treatment on a new layer, and finish by blending it with the existing layer. With this process, we can utilize the native light contained in the image, which is always a good idea for getting the most natural results, because it captures the subtle light-to-dark transitional tones that keep the photo looking alive and fresh, not altered and dull.
Let's Get Started
The most important result when processing your photos in Photoshop is that you are happy with the final image. There is no patently right or wrong way to achieve this; as with any part of photography, the end result should be an image you are proud of, and one that tells a beautiful story...how you got there is a matter of your own personal choice. |
How-to Guides
• Better Landscape Photography POST-PROCESSING TIPS Photographer Spotlight Interviews
Meet All Our Instructors
You will be learning from only the best! |

|
 |
Other Cool Stuff→ Past Workshop Photos → 72dpi.com → How-To Articles → Photographer of the Month |
|
Contact Us→ Contact Us → About Us → Site Map |
© 2009-2024 Aperture Academy, Inc.