|
|
|
|||||
|
Easily Convert Your Photo to Grayscale Using Lightroom
Article by Scott Donschikowski
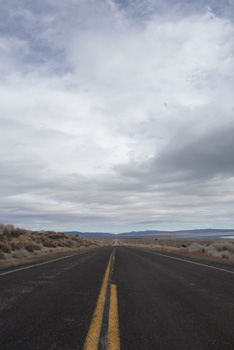
Open up Lightroom and locate your image, then switch over to the Develop Module and let's let the magic begin. So here is the image I will be working with. It's not a great image in color by any means, it's just a okay, but through processing it in black and white we are going to make it great.
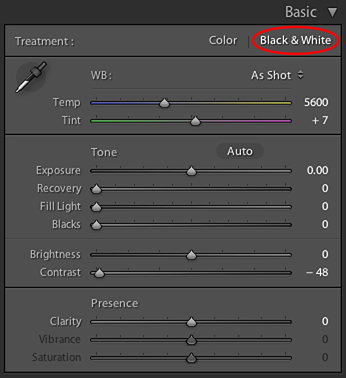
Often times deciding when to convert an image can be problematic, but my rule of thumb is, if it's not doing anything for you in color, convert it, you'll be surprised. Ok back to the image. There are couple ways to do this in Lightroom. The easiest way is just to click Black & White in the Basic Panel here:
This is where I begin to develop a story for the image. Photographs are visual storybooks, and the more sense of story you can convey, the more I think an image is successful in eliciting an emotional response. So in adjusting 3 very basic things, I can begin to determine what direction I want to take with this image. I'm beginning to feel that the clouds are menacing, and along this road, there are no good tidings to be had. So in thinking this, I really want to begin to accentuate my point by diving a little deeper and creating even more contrast and definition. You may remember that we converted this image into Black and White, and there's a word missing from that phrase. That word is desaturate. We have NOT desaturated this image, meaning all the color information is still being retained and available for us to brighten or darken as we see fit. How do we do that?
Okay, there we go. We added more drama to the sky by darkening those bluish tones. But in taking a look at the rest of image, it seems that bottom half needs some work. So in playing with these sliders, the objective is to create drama by highlighting a particular area that needs highlighting, or darkening an area that needs darkening.
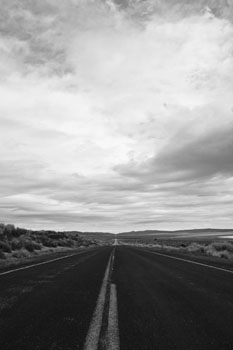
And here is our final image -- I look at this picture and begin to see a story develop, or begin to wonder what the experience was like on this road, in this moment. Looking at it in black and white, with this treatment, makes that journey even more profound and magical. So if I can impart another tidbit of knowledge in this lesson, It would be to re-evaluate the images you've taken in which you feel that for some reason or another, are subpar. Use this tutorial to convert them to black and white and you'll find that with a little tweaking you will have breathed new life into your old images. There we go, now that lane marker really pops out and provides some balance in the dark foreground. This image is nearly done now, and we have only done a few minor adjustments. The last thing to do this panel, is go back and adjust each color slider individually to see what effect they have on the overall image. I start at the top with the red slider and drag it rapidly back and forth to see the change that it makes and then stop at a level that I'm comfortable with. This idea holds true for all of the remaining sliders. Drag them to the left and to the right and evaluate the impact they have on the image as a whole. When you're comfortable with settings, you're done!
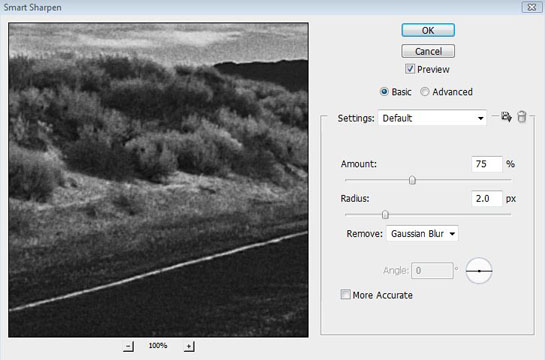
One final thing I always do before any of my images go to the web or to print is to do a final sharpening in Photoshop using Filter > Sharpen > Smart Sharpen. Play around with the amount and leave the radius at a low level, no more than 5px. You'll also want to select Gaussian Blur in the remove dropdown box. This will ensure that your image becomes tack sharp. You can click the preview checkbox to see a before and after on your whole image. Be subtle with sharpening. A very small change can have dramatic results so don't overdo it.
|
How-to Guides
• Better Landscape Photography POST-PROCESSING TIPS Photographer Spotlight Interviews
Meet All Our Instructors
You will be learning from only the best! |
 I often get asked many questions in teaching about post processing, and one I don't get as much I'd like, is how to convert a color image to black and white. I may be a little biased, having learned photography through 35mm B&W tray processing, but what monochrome images can offer is still breathtaking. De-saturating an image of color opens up new possibilities in how one looks at an image. Your mind is less likely to get distracted by color, and the minimalism of black and white is very profound, poetic and moving. The best part is that it's very to do with modern software.
 And this is our result. Dull, kinda flat and not exactly how I imagined it in my head. So I'm going to need to adjust this image using the Basic Panel again. This time I'm going to increase contrast, which will make my bright areas brighter, and darken up my darker areas. Then I'm going to increase the clarity to give it some more punch.
 Here it is after the contrast and clarity adjustment. Better, the clouds are more punchy and image looks a little sharper.
 In the B&W panel, you'll notice in this panel, we have a Black and White Mix, with a bunch of sliders. Since we stated before that all color information has been retained, we can selectively darken these colors to provide more drama in our image. The easiest way to see this dramatic change is to darken the sky by clicking and dragging the blue slider to the left.
 In this case the lane divider really needs to be highlighted, so I'm going to pull the yellow slider to the right, and maybe even the orange one too, to lighten up that foreground a bit.


|
 |
Other Cool Stuff→ Past Workshop Photos → 72dpi.com → How-To Articles → Photographer of the Month |
|
Contact Us→ Contact Us → About Us → Site Map |
© 2009-2024 Aperture Academy, Inc.