|
|
|
|||||

Day 1:
For most everyday people, when you look up at the night sky you see the moon, a few stars and maybe a bright planet every once in awhile...but for those people brave enough to stay up past 9pm and venture into the heart of the desert southwest...much more awaits.
The Milky Way visible with the naked eye, and a billion (no exaggeration) stars decorate the night sky. Even as many times as I've experienced this myself it never gets old and I get great satisfaction when I hear guests gasp in wonder as they gaze to the heavens above.
On a crisp, cool day in mid-November, eight guests arrived in Moab Utah for a journey into the “Dark Side” of photography. With a quick orientation we dove into a short slideshow to discuss gear, settings, locations and techniques. From there we loaded up into our Mercedes Passenger Van and headed off into Arches National Park -- our first stop, Landscape Arch.
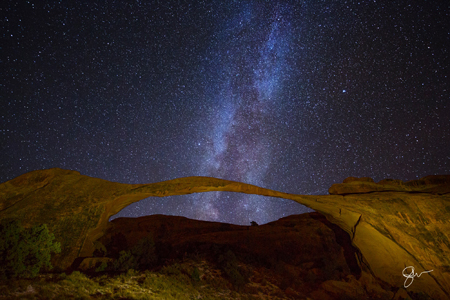
Landscape Arch is the largest natural arch in the world, spanning 191 feet and only 8 feet thick in the middle, it's quite a natural wonder in the daytime...but once the sun had set it became magical with the Milkway crossing perfectly, like an arrow of light shooting from a giant stone bow.
From the Devil's Garden area of Arches National Park we headed to our next location, Skyline Arch. This location allowed us to look north for our next shoot -- STAR TRIALS! A quick walk out to the arch we set-up, focused and programmed our intervalometers...now to let the earth spin and our cameras capture the light of the stars above.
After about an hour of star trail captures we went into light painting mode, illuminating Skyline Arch with a variety of lighting techniques until we were satisfied we had something great.
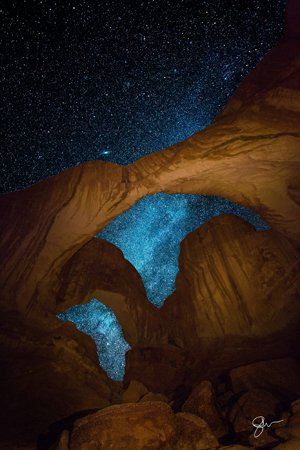
 Next stop was the very large and famous Double Arch. The Milky Way was juxtaposed nicely behind the gigantic openings and we carefully light painted the interior with soft warm light. It was getting quite cold and late so we decided to call it a night, confident we had memory chips full of great content for post processing.
Day 2:
We met the next afternoon at 3pm and headed up the Colorado River to one of the largest and most impressive arches in Utah -- Corona Arch. Corona stands 140 feet tall and looks out over a beautiful valley of rolling sandstone hills, the perfect location for this night’s star trails shoot.
After a 30-minute hike up to the Arch everyone used the last daylight hours to capture the grandeur of this impressive natural wonder before settling in to setup carefully for the night shoot. While we waited for darkness to envelope the landscape we laid on the rocks staring up at the stars, talking and eating some dinner. Now it was time to shoot! We started the shoot with one-minute exposures...45 of them to be exact! Our goal was to take a series of images that we would later "stack" to optimize the final quality of the image with little noise and rich color. Once that was complete Phil entered the scene with a small glowing light and backlit himself against the arch wall, creating a tremendous sense of scale. With that we light painted the arch from a few different angles. With many images captured, it was time to hike back to the van and head to our next location.
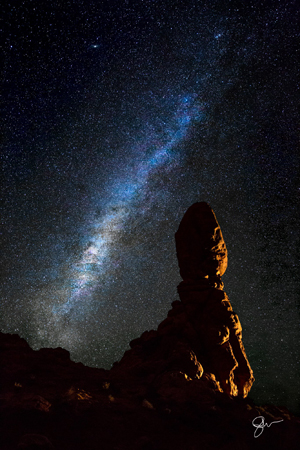
We arrived at Turret Arch about 45 minutes later (after a quick coffee/bathroom break) and made the short walk out to the base of the arch. The Milky Way was in the perfect position for our next shoot! After about 30 minutes at Turret Arch we made a very short drive to Balance Rock for our final shoot of the night. Again, the Milky Way was nicely juxtaposed with the famous Balanced Rock and we did some more light painting...however, this shoot would turn out best lit by the faint headlights of a passing car. We first thought that particular shot was ruined but when everyone's shutters stopped, in unison...everyone gasped a "wow cool!"...Phil and I knew no more light painting was needed.
 Day 3: Post
Our final day together we gathered in the hotel conference room (setup as our classroom for the workshop) and spent the next four hours with our guests teaching them how to stack star captures into Photoshop, how to build in the light-painted base layer and then do final post-processing to pull the best colors out of each element of the final image.
We also worked with Lightroom using curves and contrast adjustments to pull every juicy detail out of the Milky Way images that had been captured.
Upon reflection, this was one of my favorite workshops I've ever done...the group was amazing and Mother Nature treated us to the best possible conditions (other than it being 35-30 degrees!). A very big thank you to Mother Nature and all our guests!
Until next time,
Stephen, Phil and the rest of the Aperture Academy Team!
If you'd like to join us at one of our workshops, you can find the schedule/sign up here.
 |
 |
||
 |
 |
|
 |
Other Cool Stuff→ Past Workshop Photos → 72dpi.com → How-To Articles → Photographer of the Month |
|
Contact Us→ Contact Us → About Us → Site Map |
© 2009-2024 Aperture Academy, Inc.