|
Stability helps us sleep at night, and makes life easier. Considering how important stability is to our everyday lives, it amazes me how often people overlook it when it comes to their photography, opting to go with inexpensive tripods, if they even use a tripod at all.
A good tripod makes all the difference to photography. We get calls at the gallery, e-mails, and people ask us more questions in regards to tripods than any other piece of equipment. To better understand the importance of the tripod to photography, we'll look at a few of the reasons landscape photographers don't leave home without one. Then we'll go over what to look for when buying your own tripod.
 First and foremost, tripods provide stability. Believe it or not, you can't hold a camera dead still when trying to photograph a scene. At the very least, there will be some vibration introduced to the camera in the process of taking your photo. First and foremost, tripods provide stability. Believe it or not, you can't hold a camera dead still when trying to photograph a scene. At the very least, there will be some vibration introduced to the camera in the process of taking your photo.
- With a normal mid-sized lens, say 50mm, the typical saying is that it becomes VERY difficult to handhold a shot at anything below 1/60 of a second.
- If you're photographing wildlife with a larger lens (say 100-400), the rule of thumb is that your shutter speed should be double your focal length in order to minimize vibrations.
- If you're shooting at 200mm, you will need 1/400 of a second to hopefully capture a nice sharp image.
In low or limited light, stability becomes more and more difficult. Seasoned pros can usually handhold about 2 stops lower than normal and achieve decent results...but this usually requires contorting into an abnormal position, locking elbows, using a knee as a resting point, or some other kind of bodily interpretation of a tripod.
Many newer lenses put in vibration reduction functions to help alleviate the issue. This works great, but expect to pay a great deal more for lenses that have this function over those that don't. For example, the Canon 70-200 f2.8 lens without image stabilization will be priced in the $1300-1400 price range. The same lens with image stabilization runs about $2300. You're paying in the neighborhood of $1,000 for this feature. I hate to say it, but that extra money would buy a pretty nice tripod. Think about the fact that you turn OFF the image stabilization feature when you shoot from a tripod, and it becomes a no brainer.
Tripods allow you to take sharp images without the fear of the camera vibration that is likely to occur when trying to handhold. Who wants slightly blurry images? It means you screwed up. "Yeah, I like this image a lot...but I'd like it more if it weren't blurry." Or, "Yeah it is a bit blurry...but it was getting dark, and I had no other choice...the sunset was just awesome." How many times do you want to explain why your photos are "off"?
Stop making excuses and start taking better photographs!
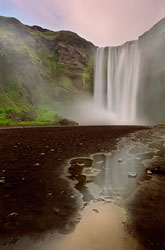
Did you ever see one of those silky waterfall images in a magazine and wonder, "How the heck did they do THAT?!" Actually, it's easy. The main ingredient is not technical skill. There is a bit of that, sure, but the main component of getting those types of images is a tripod. Once you place your camera on a tripod, the choices of how you want your images to look is up to you. You're no longer bound by the limits of your shutter. If you want to capture an image of the sea over hours, you just need to pick the right time of day, set up your camera, trip the shutter, and wait. If there isn't a strong breeze blowing or a pesky 5 year old shaking your tripod, you're good to go.
The advantages of a tripod don't end with moving water. Many of the images you see these days have been captured ON a tripod.
- Star trails — tripod
- Nighttime city skylines — tripod
- Architecture interiors — tripod
- Portrait work — tripod
- Product photography — tripod
 I could go on, but there isn't a type of photography that doesn't benefit from using the tripod in order to maximize one's ability to think creatively and take control of light and time. When I approach a scene now, I don't worry about capturing the image I have in my mind. I only worry about how long I will have to sit and wait for it to turn out. Even on images where the exposure needed could be achieved by handholding, why risk it? Use a tripod to make certain your image will be crisp and perfect. I could go on, but there isn't a type of photography that doesn't benefit from using the tripod in order to maximize one's ability to think creatively and take control of light and time. When I approach a scene now, I don't worry about capturing the image I have in my mind. I only worry about how long I will have to sit and wait for it to turn out. Even on images where the exposure needed could be achieved by handholding, why risk it? Use a tripod to make certain your image will be crisp and perfect.
Take the image to the right, for example. I knew what I wanted with this shot. Horsetail Falls in Yosemite National Park is one of the new big things in photography. I knew going in that I wanted as different an image as possible. First off, I planned on shooting it monochrome to give it an immediately different feel than most I had seen. The second thing I had in mind was a longer exposure, so I could blur clouds. In most images of the shot I'd seen, the top left corner was always flat sky. I'm a big proponent of filling as much of my images as possible, so there isn't a flat section with nothing in it. I knew that I would need clouds to fill that area. I set up my tripod with my 100-400L lens so I could get the shot I had in mind, using a long exposure (30 seconds) — without a tripod, this shot would have been impossible to make.
 Every time you open your shutter, there is vibration introduced to the camera. The best way to minimize this is to use a tripod. The tripod allows you to set up the shot the way you want it, and then leave it in place so you know that when you trip the shutter the image will be like you framed it. Every time you open your shutter, there is vibration introduced to the camera. The best way to minimize this is to use a tripod. The tripod allows you to set up the shot the way you want it, and then leave it in place so you know that when you trip the shutter the image will be like you framed it.
Hand-holding an image, I've found, is tough because you always move a bit from when you frame it to when you click the shutter. I've always operated under the rule that images made using a tripod will be sharper and of higher quality every time.
Some will argue that using a tripod becomes a lot of hard work when photographing wildlife. I agree. It can be. Using a monopod (or your tripod, with legs folded in) will help give you stability and mobility. A Wimberly or Gimbal head for your tripod will also help give you stability and mobility for shooting wildlife. Anything you can use to increase stability, and minimize your contact with the camera, will increase overall image quality.
Alright, I think most people easily agree those are some pretty good reasons as to why a tripod is helpful. The biggest question we're asked though is, WHICH ONE DO I BUY?!?
Believe it or not, there's a lot to consider when buying a tripod. Let's take it step by step.
First and foremost, how serious are you about photography? Is it something you're planning on doing regularly? Once a month? Only on vacations? Do you plan on shooting a lot of landscapes? Do you want to make the most out of sunsets and sunrises?
Once you know the answers to these questions, break the selection of your tripod down to a few key categories (mentioned below), and then make the call based on what you feel will benefit you the most.
If you are a serious photographer, or serious about your photography, then don't buy a plastic tripod. I see these tripods all the time. They run $20-$30 at any electronics store. They're usually made by Sunpak.
These tripods are not a good option....
I get it. We all spend a great deal of money on our camera gear — $2500 for a body, $700-1200 on a lens (double that if you buy more than one) — so, the last thing we want is to spend MORE money on a tripod. I know, because my first few tripods all cost less than $50. I see it all the time, $3000 worth of gear resting on $30 worth of stability.
The cheap tripods are usually made of plastic. Plastic isn't the most stable material, and breaks a lot. IF you plan on using your tripod a lot and will be taking it out into the wilderness with you, plan on it breaking when you need it most. I've had the attachment plate snap, the arm of the head break in two, the legs fall off, the middle column fall out, and the list goes on. Each time was RIGHT in the middle of shooting...and caused me to miss out on the photography, and curse loudly. I was mostly to blame. I would buy a $20 tripod. Break it. Then swear I would treat the next one better and upgrade to a $35 tripod...which I would promptly break on the 3rd time out instead of the 1st. I once broke a plastic tripod in the car getting it ready. I never even used it once.
Most of these plastic tripods have limiters built into the legs, to keep them stable. This limits their outward movement which limits how low you can get to the ground, and actually prevents you from moving the tripod legs into a position that creates the most stability. What use is a tripod if it can't be positioned to provide the highest stability?
The ONLY way I would ever recommend a plastic tripod is if you're a stay at home photographer, and just want to take some images of your kids, or some knit-work to sell on eBay.
OK. Let's get on to real tripods...
 The first category is USE. How are you going to use this tripod? If you're a portrait or wedding photographer, you'll be keeping the tripod indoors a lot, maybe out in a park on occasion. The size and weight of your tripod won't be as big of an issue. If you're a landscape and wildlife photographer, you'll be outside a lot, hiking, setting up in and around water. This will come into play with the type of tripod you choose. The first category is USE. How are you going to use this tripod? If you're a portrait or wedding photographer, you'll be keeping the tripod indoors a lot, maybe out in a park on occasion. The size and weight of your tripod won't be as big of an issue. If you're a landscape and wildlife photographer, you'll be outside a lot, hiking, setting up in and around water. This will come into play with the type of tripod you choose.
For me, I spend all my photography time outside. I'm in lakes, rivers, streams, etc. I'm in the ocean. I'm almost always on some kind of uneven terrain. Often it's below freezing outside. I need a tripod that will handle all of those conditions. Once you know how your tripod is going to be used, you can start to size it up in terms of what it can and needs to do.
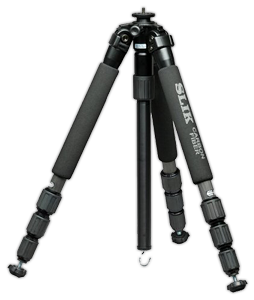
The first thing I know I need is a tripod with adjustable legs, not ones in a fixed position. I need to be able to lengthen legs, and move them into a position that allows them to be more stable. Tripods come in a variety of leg lengths, too. When you order a tripod, look at the total height of the product, and then ask yourself if you need a tripod that tall? Remember, taller tripods mean bigger, heavier tripods. If you're 4'9", do you really want or need a tripod that extends to 74" in height? For me, a good rule of thumb is a tripod that will extend to my eye height, or slightly taller.
In addition to the lengths of the legs, they also come with a variety of leg locking mechanisms. Some twist, some turn, some have levers or switches to flip in order to tighten. I personally am a fan of the twist lock legs. When I look at the legs, the more mechanical pieces I see out and exposed to the world, the more I see something I can break. The twist legs have all that stuff INSIDE the tripod. There are no levers, or screws that can rust, get stripped, get bent on a rock, or just fall off. I never liked the twist-lever leg locks. The levers always got caught on the bungie straps when I tried to take my tripod off my bag...and then when I went to shoot in a hurry, I often got snapped by the cord that was stretching right along with me as I ran to set up my tripod. The twist locks remove that peril for me.
If you are primarily an indoor photographer, you might like the flip-switch legs, or turn-lever style. Indoor photography has the luxury of having far less chances for tripod damage. When you're outdoors, remember, if it can get caught or snapped off...it WILL get caught or snapped off.
Once you know what kind of legs you want on your tripod, then you need to decide what you want it made out of.
- Carbon fiber is expensive, light, durable, easy to clean, handles the elements well, and has minimal vibration (when I talk about vibration, I'm talking about a car driving by, people walking on a pier near you, water rushing by in a creek, etc.)
- Aluminum is cheap, lightweight, easy to clean, fairly durable to elements, but can have quite a lot of vibrations in certain circumstances. Aluminum is very receptive to vibrations. I've also seen quite a few of them bend or get dented so that they don't close right.
- Wood is expensive, durable, very stable for heavy gear, and if treated correctly, good in the elements, very low vibrations, but it weighs a TON. It's not something you'll want to lug around longer than you need to. For people who do a lot of indoor work, or photography with very limited walking, wood tripods aren't a bad way to go.
There are other materials as well, such as metal, basalt, plastic (which we discussed) and some combination systems. For landscape and wildlife photographers, the tripod goes with them everywhere. Weight is a big factor. Carbon fiber tripods are the norm for landscape and wildlife photographers. Once you've lugged around a 10-15lb. tripod for any period of time, you will relish the joys of carbon fiber.
IF you're an outdoor photographer, you're going to probably want the carbon fiber to minimize vibration, handle the weather, and not throw your back out while you carry it from place to place. If you're an indoor photographer, you'll probably want a carbon fiber tripod, or wood. Lots of indoor work is shot on a floor that maybe receptive to vibrations, depending on how many people are milling about.
This is simple. Good tripods will tell you what weight they're rated for. If you're shooting a typical DSLR body with a 100-400mm lens, you're looking at maybe 8-10 lbs. of weight on a tripod. Don't put it on a tripod rated for 4-8 lbs. If you do, you're dealing with a top heavy item now...and if it falls...you'll cry.
Take a moment to think about it. Are you saving to buy that 500mm lens? Will you ever upgrade to a medium format or large format? Think about the weight you perceive you'll be putting on your tripod, then give yourself 5 lbs. extra in the rating, and you should be fine.
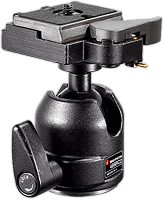 There are a lot of different options for this. Some people think that the tripod and head need to be the same brand, but often that's not the case. Many heads will work with different legs. For our discussion, there are two basic types of tripod heads. Ball-head and pan-head. There are a lot of different options for this. Some people think that the tripod and head need to be the same brand, but often that's not the case. Many heads will work with different legs. For our discussion, there are two basic types of tripod heads. Ball-head and pan-head.
A ball-head is basically a ball in a socket (kind of like your shoulder). You turn the knobs and then it moves whichever way you want it. The head usually has a couple little slots, so you can rotate the camera to shoot vertically. It's very easy to move, and make fine adjustments. Most ball heads have two knobs to turn in order to move the camera, one for larger moves and one for fine tuning. My only complaint about this kind of head is that some models only have one notch for making the camera vertical, and sometimes this requires picking up the whole tripod and moving it in order to get things framed properly. Keep this in mind, the true test of a tripod's worth is how it will hold your camera when vertical. Once you tilt the camera to the side, the balance has shifted. If you have a cheap tripod, this offset of weight could lead to a fall if you're not paying attention, or if a good breeze blows. One of my early plastic tripods was blown over set up vertically.
Pan-heads are adjustable by handles, one for up/down and one for left/right. These tripods are just a different option. Some people like the compact, ergonomic design of a ball-head better. Some people like handles. I personally don't like the handles because they get in my way. Sometimes I'm not able to adjust the tripod the way I want because the handle gets caught on a leg, or part of the tripod. I've also had handles, or portions of them, snap off in use, or get caught on a rock or some other piece of natural wonder. Remember, if it can get caught on something, it WILL get caught on something.
Some people like the pan-heads because they give the user a bit more control to line something up exactly where it needs to be. Others just use the pan-head because they prefer handles. The point is that it's up to you. Both styles of head perform the same basic function. They keep your camera on the tripod, and allow you to position it how you need.
There are other options too; I'll mention those briefly:
- Gimbal Head — A tripod that allows a large lens to be moved fairly easily and fluidly, in order to track wildlife and shoot a moving subject.
- Handle Style — This tripod has what resembles a bike handle and when squeezed, it allows the user to move the tripod to the desired location.
- Panorama Heads — These plates/heads are designed to make taking panoramic style images far easier, as they are able to be lined up to the nodal points of lenses in order to make the images easier to line up in processing.
The best way to pick the tripod that will work best for you is to go to a camera store and touch the merchandise. Understand that you do get what you pay for, but that in some cases you will be paying as much for the name on the tripod as the function you're receiving. Carbon fiber tripods WILL cost you more. Ask yourself, how much do I want to shoot? Does my $4000 camera feel safe to me on a $90 tripod?
- Read reviews on the tripods you're thinking about purchasing.
- Make the decision to make a tripod a vital piece of your gear, and buy one that will last and stand up to the type of photography you plan on creating.
- Ask friends or professionals what they use, and why.
  I get asked a lot what kind of tripod I use, and if you've stuck it out and read this far, you were probably wondering that yourself. Know this; I've used and broken at least 15 tripods in the past 10 years. I've used (my fault) the cheap plastic ones because I was cheap. I used heavier metal tripods because I figured if the plastic lightweight ones were easy to break, the larger, heavier ones would be the sturdiest. Those broke. I used the "industry standard" for landscape and wildlife photography, which I paid an arm and a leg for. It broke (not my fault). Turns out the lifetime warranty, isn't as nice as it sounds, either. Once that tripod broke I put in a lot of time researching, reading, and going to camera stores and feeling out different tripods. I needed a tripod that would work for me in all kinds of weather and conditions, and withstand the beating I put on it. I get asked a lot what kind of tripod I use, and if you've stuck it out and read this far, you were probably wondering that yourself. Know this; I've used and broken at least 15 tripods in the past 10 years. I've used (my fault) the cheap plastic ones because I was cheap. I used heavier metal tripods because I figured if the plastic lightweight ones were easy to break, the larger, heavier ones would be the sturdiest. Those broke. I used the "industry standard" for landscape and wildlife photography, which I paid an arm and a leg for. It broke (not my fault). Turns out the lifetime warranty, isn't as nice as it sounds, either. Once that tripod broke I put in a lot of time researching, reading, and going to camera stores and feeling out different tripods. I needed a tripod that would work for me in all kinds of weather and conditions, and withstand the beating I put on it.
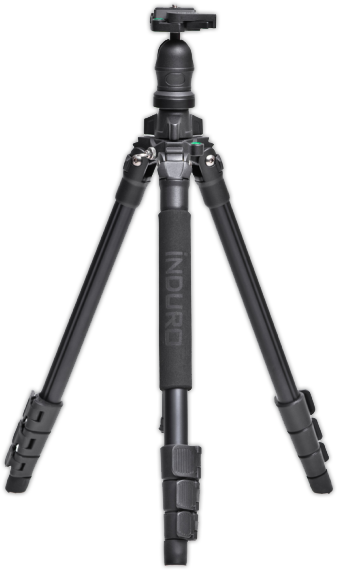
I settled on an Induro Carbon Fiber. The CLT103 and the BH-55 Ball head, to be exact.
I've taken this tripod into every condition possible. It's been to Iceland with me for 67 days and came out working beautifully. I've taken it in sand, sludge, water, oceans, and everywhere in between. It's been a GREAT tripod. That's what works for me. Now it's up to you to go find what works for you.
|

